Showing posts with label interior inspiration. Show all posts

Monday, 14 May 2012

Making it home.... Boys space bedroom on a budget

We have lift off !!!


Welcome to the next instalment of making it home a little link to share ideas and all things interiors that help to make a house home. Every Monday i put up a post on the progress of our house renovations or share inspiration and ideas or must haves for the home.

I love to save money and time where i can as there is only so much of both when your a mum so you can be reassured whatever i share will be aimed at making life easier cheaper and more beautiful.

I hope you will join in by writing similar posts or linking up old posts that provide inspiration for making your house home. If this is your first visit and you want to find out more about making it home or see the progress so far on the bedroom or kitchen or bathroom just click on the links.

Anyway without further ado here is my latest update.............


Moving and renovating can be quite unsettling for small children so the first project we tackled when
 we moved in was little E's bedroom to get him settled and feeling safe in the new home. The bedroom he has now is half the size of the nautical bedroom he left behind so some creativity was definitely going to be called for to give him a space he loves excuse the pun !!

To help settle him and make the room seem comfortable and familiar i started by painting the walls a similar colour to his previous room using satin paint as it reflects light better and is wipe able a real must in a child's room. The next thing we needed to do was raise the money to buy him some new furniture as his bed was now too small and wardrobe and changer no longer needed.

We listed his old furniture on EBay and the money raised was the budget to spend on the new bedroom. Selling his old outgrown items we raised £275 so my challenge was to create a boys bedroom for £275 or less but technically its created for free as recycled money i guess!!

I wanted to get a bed that was good quality and going to last him for a good few years so i opted for an oak single as this would  last and adapt to fit most schemes.


I shopped around and found this bed as an ex display item in a  local bed shop who were changing round to make room for new stock. It is always worth looking at ex display items as they have not been used and you don't need to wait for them as in stock. This bed and mattress cost £159 a real bargain for what would of been  £359 if i had of ordered it.

This left me £116 to finish the room so i had to search and spend wisely my first bargain was found when doing my weekly food shop at Sainsbury's i picked up this very lovely star duvet cover and pillow case  for £7.50. It's a really good match for the wall colour and also picks up on the old blind we brought with us from the old house.

The stars then got me thinking along the lines of space and from there the room started to evolve and take shape. Next i looked at storage the room had a really large double size wardrobe too big for little E's small clothes and then a small cupboard next to it which did not really give enough room to store toys.


The most cost effective way to get the storage we really needed was to remove the hanging rail from the wardrobe and cut it into two making smaller rails to fit into the small cupboard making perfect double hanging for E's small clothes.


We then just brought some wood and batons from a builders merchant for £25 (cheaper than going to diy store) and made the large wardrobe into a shelved toy cupboard and painted the shelves white to match the room.

The inside of a cupboard or wardrobe is the perfect place to display childrens artwork and little bits and pieces sort of like an open up gallery.  A few handy hooks on the inside off the other door are great for bags and all the other bits that don't have a home to hang.


Excuse the mess, at least i can just shut the door on it at night.


Left with £83.50 i searched for an in expensive way to inject some fun into the room by way off a wall sticker. I found it quite hard to find something fun and tasteful as a lot of children's stickers can be a bit tacky on the front as well as the back ha ha!

Eventually Ebay came to the rescue and i picked up this lovely space theme for £20 and they were even kind enough to send contrasting colour stars free of charge. Wall stickers are really easy to apply and are a great inexpensive way to add fun to a room.

Easy to apply and little E loved to help create his space!

Ebay also came to the rescue with the lovely space throw at the end of the bed complete with cushion and pillow case £9.50 including postage. I will tell you a bit more about this in another post as they will be changing slightly into more!!

My final £54 this went mainly to Argos where i purchased the lovely cube storage units with star and stripe boxes one as a bed side table and one at the end of the bed for £30 the next £10 went to next the little cubes on the wall and the last bit to the charity shop lamp and light shade.


There you have it a little space from recycled money and bargain finds. I will also be linking up this post on Monday magpie and Thrifty Thursday.

I hope you have been inspired to get renovating its always lovely to hear from you please feel free to leave a comment.

Now its over to you to link up how you are making it home with your ideas inspiration renovations and pinterest anything goes ........... ready steady link xx

Thought of the day.................   In every home there is space if you look for it xx

Thursday, 19 April 2012

Making it home..... Bathroom makeover

  Welcome to the first ever making it home linky!
So many of us are renovating /redecorating and making over our homes or  bringing old items back to life or generally searching for items to make our houses home.

 I thought it would be lovely to share ideas and inspiration get support if your stuck with something and just generally show the world our handy work on home projects.  Every week i will write a post following either the progress of our house as work in progress or finished projects or generally passing on lovely items and ideas i have seen.

 I hope you will join me by linking up and sharing your renovation projects and room makeovers items you have brought back to life or any relevant post about making your house home.  It can be a new or old post either finished projects or work in progress or maybe you have seen too many nice things and can't decide and need help choosing.

Hopefully its fairly simple there is a link at the bottom of the page to link up your post and i look forward seeing your projects and popping over to and visit your blog. While your linking up take a look at the other entries and find inspiration and share the blog love xx

Here's my bathroom update.................... 

  We moved  house at the end of January this year out of necessity to a home in need of improvement so that we could reduce our mortgage add value to a property and therefore allow me more time to spend with my little boy and care for my elderly mum.

 Every room needs attention..... downstairs the layout needs re arranging and the floor space needs extending but while we are waiting for planning permission etc we are starting on the upstairs.

 The bathroom changes needed are mainly cosmetic and re doing the previous owners half finished diy!! When we moved in as you can see the bath had not been fitted properly had been put in too low and this meant the bath panel did not fit. The layout was not ideal the bath sink and loo have been fitted to close together and the blue tiles and dark floor make the small room feel even smaller. The window glass has been painted along with the frame and generally the room looks small and dark and unfinished.

Before bathroom!!
We are working on a tight budget as we need to use most of our money on the kitchen and building work so here is how we managed a low cost bathroom transformation.

First we just needed to work out how to lose the blue go faster stripes as these are really making the room appear smaller..Re tiling would of been costly so before going down that route we decided to see if tile paint would work ..... I have to say i was a bit dubious at first but once i had mastered the best technique i was pleasantly surprised.


If you fancy having ago at this really cost effective way of updating tiles this is how i found to get the best result. Use a tiny roller from a craft shop as you will get a better finish than with a brush. Go over the whole area including covering existing grout rather than trying to go tile by tile. Leave to dry for longer than it says on tin i found 48 hours better.I would not bother buying a grout pen the finish is not realistic instead leave for 48 hours and then with a small tub of grout re grout the area all over the tiles then wipe off excess with a damp sponge. Voila new tiles for the tiny cost of tile paint and grout around £25 much cheaper than new tiles and someone to fit them.

Next we tackled the layout by moving the radiator and putting a slimline towel radiator on a smaller wall to free up the big wall for much needed storage. Then we raised the bath very slightly to fit the bath panel properly.We then Painted the walls a natural colour using kitchen and bathroom paint and tidied up the woodwork. 

The next project was the floor we went for a vinyl in a light oak colour to lighten and brighten the space, and chose one with a real wood floor affect. In a small room its good to use something like this as the planks draw your eye to the widest point and give the allusion of space as a result.

Storage is in short supply in our house so the bathroom was finished off with a slimline tall cabinet to get the best use of space without taking up much room.


I wanted to continue the nature theme in our house so that the rooms link together therefore i finished the room off with a lovely ex display Laura Ashley blind which i picked up for a bargain £40 and a few nature inspired accessories.


I have been really pleased with the overall result and what we managed to achieve without spending a fortune.

I hope you enjoyed this weeks offering ............ Now its over to you to link up and share how you are making your house home.

Please feel free to grab a badge

<a href="http://makingitasmum.blogspot.co.uk/ " target="_blank"><img src="http://i786.photobucket.com/albums/yy145/mediocremum/makingithomebadgefinal.gif" border="0" alt="Photobucket"></a>


Friday, 13 April 2012

Adding colour and fun to a childrens bedroom

          Patchwork Curtains

Decorating dilemma ............How to add colour and fun to a child's bedroom.

Its really easy to add colour and fun to child's bedroom without breaking the bank. Painting the walls a lovely spring green and adding a wall sticker can really transform a room. I'm a real fan of wall stickers as they are easy to apply and are an inexpensive way to instantly add fun and interest. I love this owl wall sticker from next the colours of the owls can be picked out and used in complimentary accessories such as the patchwork curtains and gingham bedding.

I think when choosing children's furniture a white bedroom set is a great investment as it will last and grow with the child as it can be dressed with age appropriate accessories .It is far cheaper to replace curtains and bedding as the child outgrows it than replacing the furniture if they suddenly go off the car shaped bed or princess castle. If space is tight in the room consider something like a mid sleeper as this will maximise the rooms floor space which is essential for  playing!

Storage is really important in a child's room as the bigger they get the bigger the toys seem to get. There are lots of fun ways to store things in children's rooms from colourful boxes baskets and drawers.

Giant Mirrored Butterfly Stickers        Card Hat Boxes  4 Tub Storage


More colour and fun can added with useful finishing touches such as the little owl door stop to match the wall sticker. I think a doorstop in a child's room is a safety feature as well as being very very cute as it avoids little trapped fingers. Lighting is also really important a bedside lamp is essential for bed time stories and a little night light that can be left on gives a child reassurance.


I found the items at next to be very reasonably priced so a lovely child's room makeover can be achieved without breaking the bank.

I also spotted Next are running a competition to win £1500 home makeover

Looking forward to starting the blog hop next week called making it home and i can,t wait to see your home transformations. Everyone is welcome let me know if you would like to join in.

Always lovely to hear from you so don,t be shy say hi and leave a comment below xx


Saturday, 21 January 2012

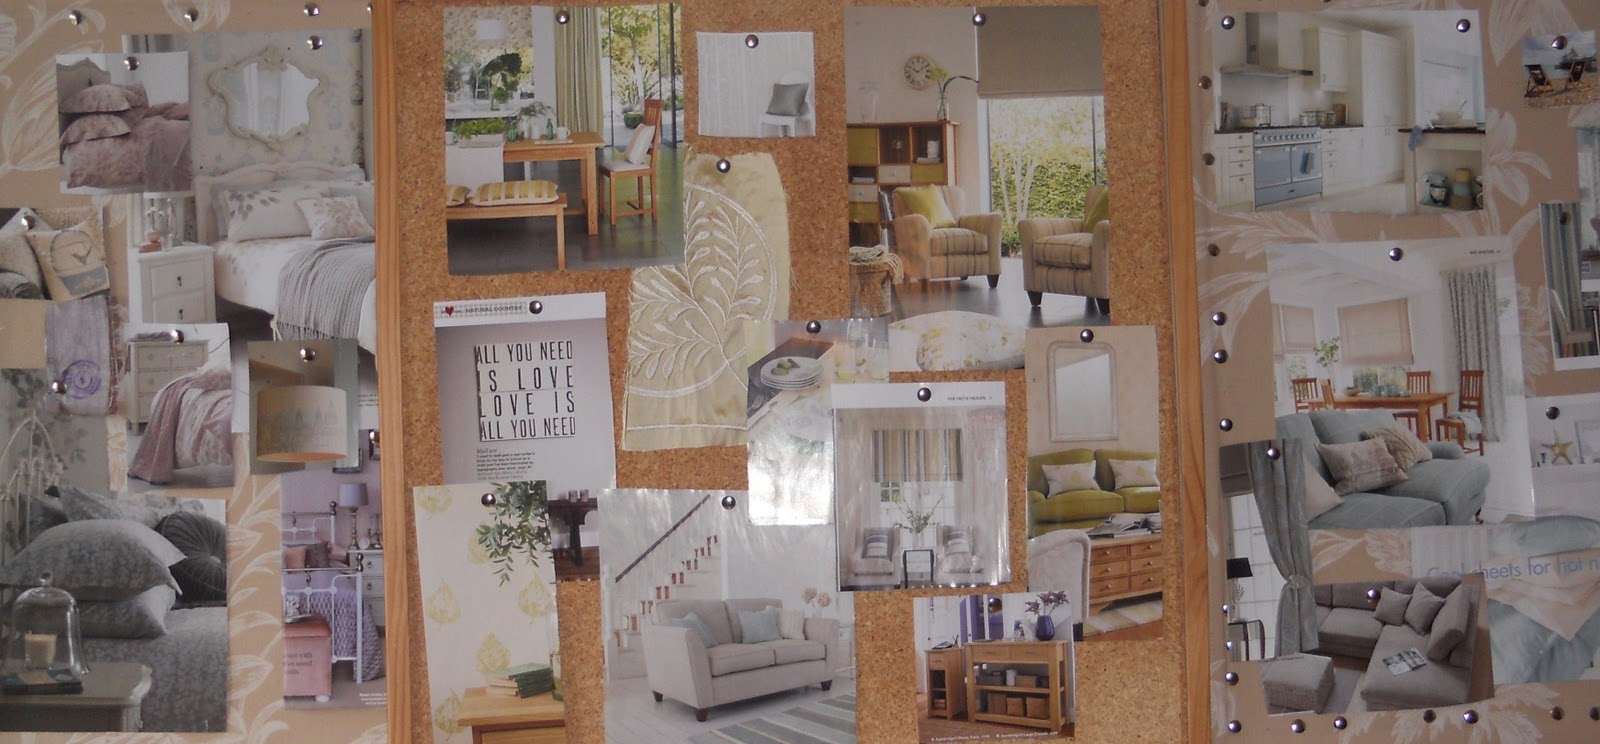
Mood boards inspired by elemental design trend


The room set

This week with the move to the new house just over a week away i managed to steal a few moments  from the packing to think about the feel i would like for the new home. I did get a raised eyebrow from my other half when amidst all the chaos i sat down with a cup of tea and pile of magazines and flicked through them at lightening speed tearing pages out. The reason i flick through at lightening speed is at this stage i am just trying to get a feel for what I'm drawn to rather than getting hung up on actual item choices.

Mood boards are a great idea when planning a new scheme as you can play round with colour and pattern see how things look together without any financial out lay. I like the flexibility of the changeable mood boards and starting with photographic images as the photos can be taken away and replaced by actual samples as and when you find them. To get the best overall feel use smaller samples of accent colours and larger ones of bigger items as this will give a better representation of the overall scheme as in proportion.


I have not concentrated here on one room i have just tried to create the feel for the whole house i think this is a good idea even if you are only decorating one room as a house needs to flow as a whole as this gives a sense of space. Thinking about the house rather than individual rooms also gives flexibility as items can be moved from room to room when you fancy a change around.


We are working on a tight budget so there are a few things we have in our current home that will need to be incorporated into the new scheme. Often though when items are put into a different room it gives them a new lease of life. When buying investment items such as sofas i tend to play safe and buy natural colours or classics such as brown leather as accent colours can be added with cushions and throws to get the desired look, these can then be replaced in expensively if you fancy a colour up date.


Inspired by the elemental design trend i have worked with the colours of nature as i love the idea of bringing the outside in. Home should be a place to relax and unwind and i cant think of anything more calming the great out doors. A small room can instantly feel bigger if the colour palate used takes your eye beyond the room to the garden outside.

Each room will have its own identity but when the three boards are put together you can see that although different colours are used the elemental inspiration from nature allows a flow around the whole home and will make it easier to move items form room to room to ring the changes.

There you go i have given everyone a good excuse now to sit down with a cuppa and flick through some magazines all in the name of research. If there are no magazines to hand or the Internet is more your thing i have also found a great site called my deco where you can create virtual mood boards on line

Its always lovely to hear from readers so please feel free to leave a comment or share your ideas.


Thought of the day....................... Get inspired